

The Speculum Solis is a handmade 8×10 large format camera built from Baltic birch plywood, designed to photograph the sun directly at solar noon and produce extremely dense negatives for salted paper contact printing. Every part of the process is handmade: the camera, the emulsion, the exposure, the print. The name comes from the hermetic tradition, where a speculum was a polished mirror used to contemplate transcendent reality. This camera is a mirror of the sun.
It wouldn’t be this fancy: no bellows or ground glass, but I realize not everyone can visualize “view camera” if it’s not something they are used to hearing.
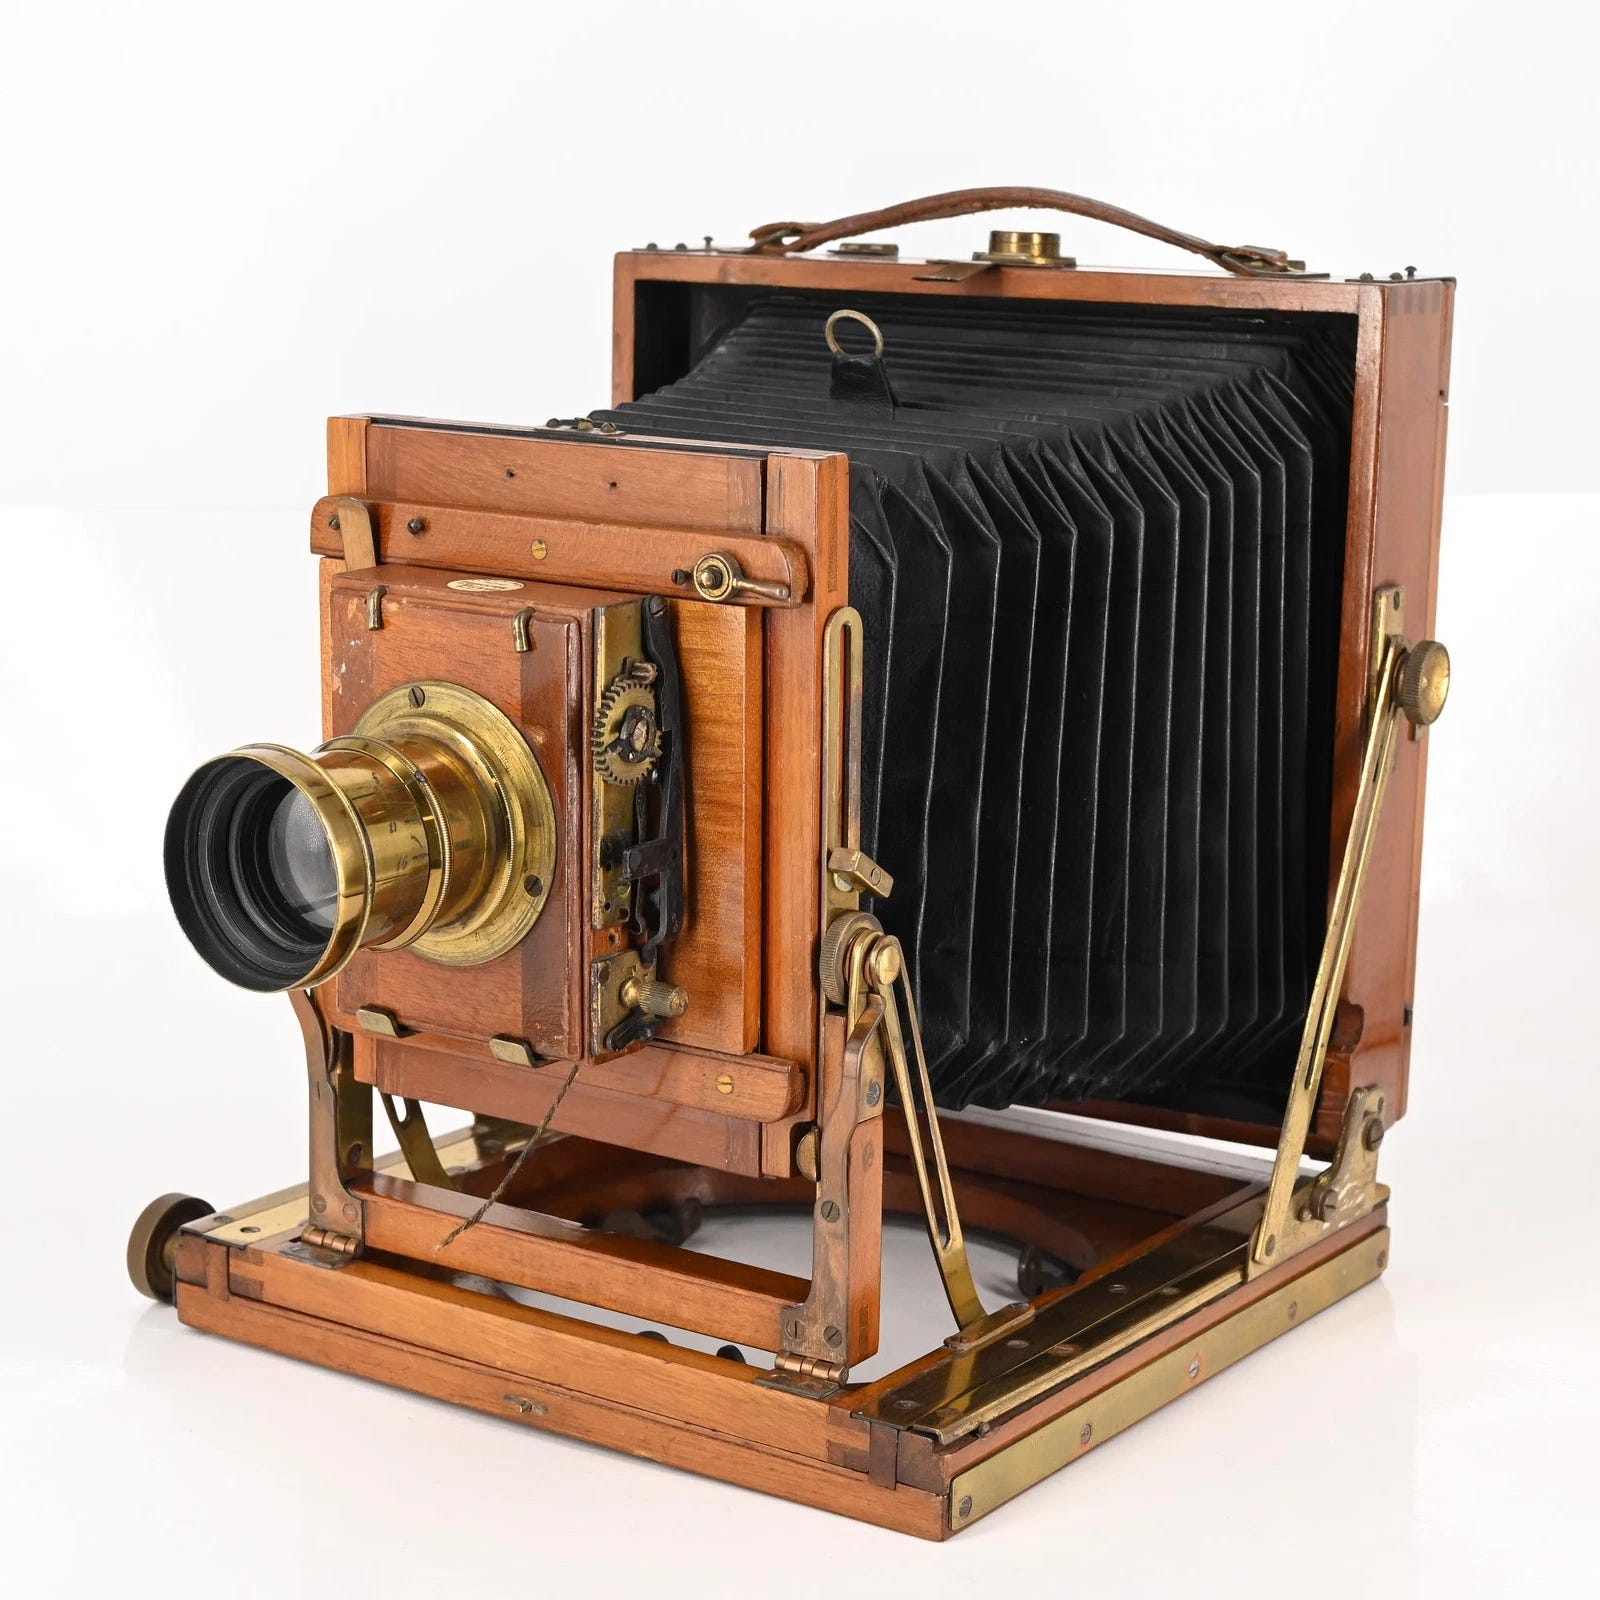
I. Understanding the Camera
The Speculum Solis is two open-ended plywood boxes that telescope together and lock permanently at a fixed 300mm focal length. No bellows, no movements, no ground glass, no mechanical shutter. None of those are needed for infinity-focus celestial work.
The Rear Box
The rear box is the outer box. Five panels: left side, right side, top, bottom, and back. Open at the front. The back panel has a large rectangular opening through which the film inside the loaded holder faces the lens. Two channel strips on each interior side wall grip the film holder lip as it slides straight down from the top of the back opening. The holder loads and unloads from the top rear. The two boxes never separate after locking.
The Front Box
The front box is the inner box. Five panels: left side, right side, top, bottom, and lens board. Open at the rear. It slides into the open front of the rear box and locks permanently at 300mm focal length with brass pins through both top panels. After that it does not move.
The Film Holder
The Graflex film holder slides straight down from the top of the rear box back opening into the channel strips. It seats with its face against the interior of the back panel. The film sits at exactly the film plane, 300mm from the lens. Pull the dark slide upward to expose. Replace it immediately after. Lift the holder straight up and out.
The Shutter
The shutter is an M39 screw-on lens cap. Remove it to begin an exposure. Replace it to end one. The minimum practical exposure is one second, which is the time needed to lift and replace the cap with a smooth, deliberate motion. Sub-second exposures are not possible with this method. Plan every session around a one-second minimum. For all the subjects covered in this guide, one second or longer is either required or preferred.
The Light Path
Celestial subject, filter (solar) or bare lens (lunar and twilight), lens, through the interior of both boxes, film at the rear box back panel. Every interior surface is flat black. Every joint is sealed with black silicone. No light enters except through the lens.
II. Materials
A. Lumber
Item Specification Qty Notes Baltic birch plywood 1/2” thick, 4×8 sheet 1 sheet All box panels Baltic birch plywood 3/4” thick, small piece 1 piece min 9-1/4”×11-1/4” Lens board, ask for offcut Thin plywood strip 1/4” thick Small amount Film holder channel strips Thin plywood ring stock 1/4” or 3/8” thick scrap Small piece Solar filter cell frame
B. Hardware
Item Specification Qty Wood glue Titebond Original 1 bottle Black silicone caulk Any brand 1 tube Foam weatherstrip Adhesive-backed, 3/8” thick × 1/2” wide 10 feet Brass wood screws #6 × 3/4” 1 box Brass wood screws #8 × 1-1/4” 1 box Threaded brass insert 1/4-20 thread 1, tripod mount Brass screw eyes Small 4, cord routing Brass corner protectors Small exterior type 8 Brass escutcheon pins Small decorative nails 4, nameplate Brass rod 1/8” diameter 6 inches, lock pins Flat black chalkboard paint Brush-on, matte 1 small can Paintbrush 2” flat 1 Small artist brush For corners 1 Sandpaper 120, 180, 220, 400 grit Several sheets each Black gaffer tape Cloth-backed, non-reflective 1 roll, filter sealing
C. Optical and Photographic
Item Specification Source Cost Lens Rodenstock Apo-Gerogon 300mm f/9, M39 thread eBay $40–100 Lens flange M39 female threaded flange, flat mount eBay $5–15 Lens cap M39 screw-on, serves as shutter eBay/Amazon $3–8 Solar filter Baader AstroSolar ND 5.0 visual grade, 1 A4 sheet Amazon/astronomy $15–20 Film holders Graflex 8×10 (already purchased) Owned — Tripod 1/4-20 head screw (already purchased) Owned — Sheet film Ilford FP4 Plus 8×10, box of 25 Adorama/B&H $60–80 Changing bag Large double-zip, Harrison or Photoflex Adorama/B&H $40–60 Rifle sights Williams peep sight set with brass bead front Gun shop/online $25–35 Dovetail rail 3/8” aluminum, 12 inches Brownells/Midway $8–15 Digital caliper For measuring film holders Harbor Freight $10–15 Field notebook Waterproof Any $5–10 Stopwatch or phone timer For exposures over 10 seconds Any —
D. Finishing
Item Specification Source Steel wool 0000 grade Hardware store White vinegar 1 quart, for iron acetate Grocery store Black tea bags For tannin pre-treatment Grocery store Watco Danish Oil Dark Walnut or Natural Hardware store Paste wax Johnson Paste Wax or similar Hardware store Nameplate Brass 3”×1”, SPECULUM SOLIS, Trajan serif, aged Etsy engraver Eva-Dry E-333 × 2 Mini dehumidifier desiccant units Home Depot/Amazon Nitrile gloves Box of 100 Hardware store Safety glasses For chemistry work Hardware store
E. Darkroom and Printing Chemistry
Item Specification Qty Rodinal / R09 One Shot Film developer 500ml bottle Rapid fixer Ilford or Kodak 1 liter Silver nitrate Crystals, for paper sensitizing 30 grams Sodium chloride Non-iodized kosher salt Small box Sodium thiosulfate Crystals, for print fixing 500 grams Hypo clearing agent Kodak or Heico Perma Wash 1 packet Gelatin sheets For paper sizing Small amount Egg albumen Fresh eggs, for salt coat binder As needed Distilled water 1 gallon jugs 3 gallons minimum Processing trays 11×14 inch minimum 3 Brown glass bottles 500ml, for chemistry storage 5 Darkroom thermometer Accurate to 1 degree 1 Hake brush 2” wide, soft, one per chemistry type 2 Fabriano Artistico paper 300lb hot press, 8×10 or larger 20 sheets Contact printing glass Optical quality, 10×12”, 2 pieces Local glass shop Heavy binder clips Large size 6
III. Cut List
Hand this to the Home Depot cutting desk. All cuts are straight cuts. Check each piece before leaving the store.
A. From One 4×8 Sheet of 1/2” Baltic Birch Plywood
Rear Box, 5 pieces:
Piece Dimensions Qty Purpose Side panels 11” × 13” 2 Left and right walls of rear box Back panel 11” × 13” 1 Back wall, receives film holder opening (jigsaw) Top panel 10” × 13” 1 Top of rear box Bottom panel 10” × 13” 1 Bottom of rear box, receives tripod insert (drill)
Front Box, 4 pieces:
Piece Dimensions Qty Purpose Side panels 9-1/4” × 11-1/4” 2 Left and right walls of front box Top panel 8-1/4” × 11-1/4” 1 Top of front box Bottom panel 8-1/4” × 11-1/4” 1 Bottom of front box
B. From Small Piece of 3/4” Baltic Birch Plywood
Piece Dimensions Qty Purpose Lens board 9-1/4” × 11-1/4” 1 Front panel of front box, lens hole and flange
C. Channel Strips — Cut After Measuring Film Holders
Piece Dimensions Qty Purpose Inner strips 1/4” × 1/2” × [holder height]” 2 Flush against back panel interior face Outer strips 1/4” × 1/2” × [holder height]” 2 Parallel to inner, gap equals holder lip thickness
D. Solar Filter Cell — Cut After Lens Is Mounted
Piece Dimensions Qty Purpose Outer ring 1/4” ply, outer ~4”, inner = lens barrel OD + 1mm 1 Sits over lens barrel Retaining ring 1/4” ply, same outer, inner slightly smaller 1 Sandwiches filter film
E. Jigsaw Cuts
Cut 1: Film Holder Opening in Rear Back Panel
Mark a rectangle centered on the 11”×13” back panel. Opening width equals holder face opening width plus 1/16” clearance each side. Opening height equals holder face opening height plus 1/16” clearance. Leave 3/4” border left, right, and bottom. The top of the opening extends to within 1/2” of the panel top edge — no border at top. That is what allows the film holder to slide straight down from above. Drill a starter hole, cut with the jigsaw, sand the inside edges smooth.
Cut 2: Lens Hole in Lens Board
Find dead center of the 3/4” lens board by drawing diagonal lines corner to corner. Where they cross is center. Place the M39 lens flange face down centered on that point and trace the inside of the flange. Drill a starter hole, cut the circle slowly. File or sand until the flange sits perfectly flat against the wood with its center aligned.
IV. Build Instructions
Step 1: Measure Your Film Holders Before Anything Else
Before cutting anything, measure all three Graflex holders with a digital caliper. Write down every measurement. When building, use the largest value in each category so all three holders fit.
Measurement What to Measure Used For A: overall thickness Full holder body, jaw to jaw at center Interior depth reference B: lip thickness The flat flange lip only Gap between inner and outer channel strips C: lip projection How far the lip extends from holder face Forward position of outer channel strip D: overall width Full width including both lips Must fit within 10” rear box interior E: overall height Full height including lips Channel strip length F: face opening width Clear film gate opening on holder face Film holder opening cut, width G: face opening height Clear film gate opening on holder face Film holder opening cut, height
Standard 8×10 film plane depth from holder reference surface to film is 0.251 inches with film loaded. Verify the Graflex holders are within spec. Vintage wood holders can warp. Replace any that are significantly out of spec.
Step 2: Make the Two Jigsaw Cuts
Film holder opening in back panel: mark the rectangle using measurements F and G plus 1/16” clearance, centered, 3/4” borders left, right, and bottom, opening to within 1/2” of the top edge. Drill starter hole, cut with jigsaw, sand inside edges.
Lens hole in lens board: find dead center with diagonal lines. Trace the M39 flange inner diameter. Drill starter hole, cut slowly. File to fit. The flange must sit perfectly flat.
Step 3: Paint All Interior Faces Before Assembly
Paint before assembly. Once the boxes are built, many interior surfaces are unreachable.
Mark the exterior face of every piece with a pencil X. Sand interior faces through 120 then 180 grit. Apply flat black chalkboard paint, two coats on all interior faces, three on all edges and corners. Cure overnight.
Step 4: Assemble the Rear Box
Side panels (11”×13”) are the outer walls. Top and bottom (10”×13”) fit between the sides: 10” + 1/2” + 1/2” = 11”. Back panel closes the rear. Front stays fully open.
Dry fit first. Confirm all corners square, back panel flush, no gaps over 1/16”.
Glue and screw: left side to top panel, Titebond bead, clamp, check square, two countersunk pilot holes, #8 × 1-1/4” brass screws. Right side to top panel, same. Both sides to bottom panel, same. Back panel: glue all four edges, clamp all sides, check that both diagonal measurements are equal, screw around the perimeter every 4”. Cure overnight with clamps.
Caulk: run black silicone along every interior corner and joint. Smooth with a wet finger. Cure 24 hours.
Step 5: Install Film Holder Channel Strips
Cut four strips 1/4” × 1/2” × measurement E tall. Cut slightly oversized, sand to fit.
Inner strips: back edge flush against the back panel interior face, full length of the opening. Glue and pin nail. Both sides.
Outer strips: gap between inner and outer equals measurement B exactly. Glue and fasten.
Test fit before the glue cures. The holder must slide smoothly with no binding and seat firmly against the back panel. Adjust before the glue sets. This is the tightest tolerance in the build.
Weatherstrip: foam weatherstrip around the entire perimeter of the film holder opening on the interior back panel face.
Step 6: Assemble the Front Box
Side panels (9-1/4”×11-1/4”) are the outer walls. Top and bottom (8-1/4”×11-1/4”) fit between the sides: 8-1/4” + 1/2” + 1/2” = 9-1/4”. Lens board closes the front. Rear stays open.
Assemble sides to top and bottom panels: glue, clamp, square, pilot holes, brass screws.
Attach lens board to front: glue all four front edges, clamp, check square, drive screws around the perimeter.
Caulk all interior joints. Cure 24 hours.
Apply adhesive foam weatherstrip around the entire outside perimeter of the open rear end, all four sides. This is the primary light seal between the two boxes.
Step 7: Mount Lens Flange and Lens
Center the M39 flange over the lens hole on the exterior lens board face. Mark four mounting hole positions. Drill pilot holes. Apply a thin bead of black silicone around the lens hole perimeter. Seat the flange. Drive four brass screws evenly in a cross pattern. Thread the Rodenstock Apo-Gerogon in until firmly seated. Seal around the outside edge of the flange with black silicone. Cure 24 hours.
Lens Board Tilt Check: Do Not Skip. A tilted lens shifts the focal plane and degrades sharpness across the frame. Sight down the lens barrel from the front. The aperture blades should appear as a perfect circle, not an ellipse. From the side, confirm the barrel is perpendicular to the board face with a small square. If tilt is present, shim under the flange on the high side, retighten, reseal, recheck.
Step 8: Build and Mount the Solar Filter Cell
Safety. Never look at the sun through any optical device without a properly mounted ND 5.0 or higher solar filter. The solar filter cell is used only for solar photography. For lunar and twilight photography, remove it entirely. Handle the Baader film carefully: a pinhole or tear means replacing the whole cell.
The Baader AstroSolar ND 5.0 filter must be mounted in a rigid cell that registers over the lens barrel with a fully light-tight seal. A loose sheet of filter film laid over the lens is not acceptable.
Measure the lens barrel outer diameter precisely with the caliper.
Outer ring: 1/4” plywood, approximately 4” outside diameter, inside diameter equals lens barrel OD plus 1mm. Cut with jigsaw. Sand the inside diameter smooth. It should slide over the barrel with slight friction.
Cut the Baader film approximately 1/2” larger than the outer ring outside diameter in each direction. Handle by edges only.
Retaining ring: same outside diameter as the outer ring, inside diameter 1/4” smaller than the filter film piece.
Assemble: thin black silicone bead on the top face of the outer ring. Lay the Baader film over it. Another bead on the film perimeter. Press the retaining ring down. Clamp lightly. Cure 24 hours.
Weatherstrip: foam weatherstrip around the inside diameter of the outer ring, the face that presses against the lens board when mounted.
Mount: slide the filter cell over the lens barrel until the weatherstrip face presses against the lens board. Secure with two strips of black gaffer tape crossing over the cell onto the lens board. Replace the tape each session.
Testing the Filter Cell. With the filter cell mounted and the lens cap removed, take the camera to a dark room. Shine a bright flashlight at the filter cell from various angles. Check from behind. No light should penetrate the cell edges. Any glow means more foam weatherstrip or gaffer tape is needed.
Step 9: Pre-Lock Sharpness Verification
The brass pin lock is irreversible. A 1–2mm focal length error produces noticeable softness. Do not drill until sharpness is confirmed by a test exposure.
Slide the front box to the 300mm position. Clamp both boxes firmly with large binder clips on all four sides. Do not drill yet.
Load photographic paper in a film holder. Aim at the sun at solar noon using the composition template. Make a test exposure of 4 seconds at f/45 with the solar filter mounted. Develop in print developer for 60 seconds.
Evaluate the solar disc edge under a magnifier. It should be crisp and well-defined. If soft, adjust focal length 2–3mm and repeat.
f/45 introduces visible diffraction softening. That is intentional: it produces exposure times of one second and longer that are practical to hand-time. For salted paper contact printing, the slight softness is compatible with the process. Working at f/22 reduces diffraction but requires more precise timing at shorter exposures.
Once sharpness is confirmed, mark the box positions with a pencil. Drill two 1/8” holes through both top panels simultaneously, one 2” from the left side, one 2” from the right side. Insert the brass rod pins. Seal with black silicone. Attach small chains to the pins so they cannot be lost.
Step 10: Install Tripod Mount
On the exterior bottom face of the rear box bottom panel, mark center: 5” from each side, 4” from the back edge. Drill the hole for the 1/4-20 threaded brass insert. Install flush with the surface. Test with the tripod screw.
Step 11: The Lens Cap Shutter
The M39 screw-on lens cap is the shutter. One second minimum. Plan every session around that.
Exposure Sequence:
Insert film holder. Confirm it is fully seated.
Pull the dark slide completely upward. Set it safely aside.
Hold the lens cap loosely over the lens barrel without threading it.
Lift the cap cleanly away. Exposure begins. Start counting or start a timer.
At the end of the count, replace the cap firmly. Exposure ends.
Replace the dark slide immediately.
Flip the dark slide to black side out. Note the exposure in the field notebook.
Thread the cap back on fully.
Timing:
1–9 seconds: count one-one-thousand, two-one-thousand. Reliable to within half a second.
10–60 seconds: phone stopwatch or wristwatch with second hand. Start as the cap lifts.
Over 60 seconds: phone timer set to the target duration. Lift cap when it starts. Replace cap when it ends.
Step 12: Mount Rifle Sights
Center the 12” dovetail rail on the rear box top panel, running front to back along the exact centerline. Four pilot holes through the rail. Drive small brass screws.
Slide the rear peep sight approximately 2” from the rear. Lock. Slide the front bead sight approximately 2” from the front. Lock.
Alignment check: the bead must appear perfectly centered in the peep aperture. The sight line must be parallel to the lens optical axis in both planes. Reposition and relock until confirmed.
Step 13: Light Leak Test
This must pass completely before any film is loaded.
Load a film holder with photographic paper. Seat it in the camera. Pull the dark slide. Mount the filter cell. Remove the lens cap.
Dark room: wait 5 minutes for eye adaptation. Flashlight inside the camera pointed toward the lens. Inspect every exterior surface for any glow. Mark leaks with chalk. Seal. Repeat until zero leaks.
Paper Confirmation: Load paper in a holder. Pull the dark slide. Mount the filter cell. Replace the lens cap. Outside in direct sun for 30 minutes. Develop the paper. Completely clear paper with no marks means no leaks.
Step 14: Iron Acetate Ebonizing Solution
Drop four pads of 0000 steel wool into a glass jar of white vinegar. Leave uncapped for 3–5 days until dissolved. The solution turns dark amber. Start this while assembling the camera so it is ready when construction is done.
Step 15: Exterior Finishing
Only after the light leak test passes. Do not disturb sealed joints.
Sand all exterior surfaces through 220 grit.
Tannin pre-treatment: five tea bags in one cup of boiling water. Apply two coats to all exterior surfaces, dry completely between.
Iron acetate: brush onto all exterior surfaces. The wood darkens immediately. Two to three coats, cure overnight between each. Sand 400 grit between coats.
Danish Oil: two coats, 24 hours between, wipe off excess after 20 minutes each. Buff with 0000 steel wool when fully cured.
Paste wax: apply by hand. Buff to a gentle sheen.
Step 16: Mount Brass Hardware
Brass corner protectors on all eight exterior corners with small brass screws.
SPECULUM SOLIS nameplate centered on the lens board below the lens. Mount with brass escutcheon pins. Tap gently until flush.
V. Composition Template
Cut a piece of black foamcore to the exact interior dimensions of the film holder gate. It slides into the camera channels the same way the film holder does. The sun or moon projects a bright spot through the lens onto it, letting you place the disc precisely before loading any film. For solar work the spot is immediate and intense. For full moon work it is dim but visible when eyes are fully dark-adapted.
Making the Template
Measure the actual clear gate opening of the Graflex holders. Cut the foamcore to that exact size. Build up the thickness with laminated layers to match holder depth so it seats at the same depth as the loaded holder.
Mark dead center with a crossed hairline. Make a needle pinhole at each of the four golden ratio points and at dead center.
Golden Ratio Points on 8×10
Position From Left From Top Character Upper left 3.09” 3.81” Presiding: formal, austere Upper right 6.91” 3.81” Presiding: formal, reversed weight Lower left 3.09” 6.19” Rising: active, ascending energy — recommended first attempt Lower right 6.91” 6.19” Rising: reversed, balanced weight Dead center 5.00” 5.00” Mandala: confrontational, archetypal
For golden hour, blue hour, and lunar work, the lower left rising position is the strongest. The disc emerging from the lower left against a large dark field suggests movement and imminence.
VI. Solar Photography
The camera was built for solar noon but works across the full range of solar and twilight conditions. The character of the negative changes with each condition. The solar filter cell is required whenever the sun is above the horizon, no matter how dim it looks.
A. Solar Noon
Solar noon in Corpus Christi falls between 12:30 and 1:15 PM depending on the time of year. Maximum elevation, shortest atmospheric path, highest UV intensity, sharpest disc. This is the primary use case.
Condition Aperture ISO Filter Starting Exposure Notes Noon, clear f/45 125 ND 5.0 2s Bracket 2s, 4s, 8s, 16s Noon, thin haze f/45 125 ND 5.0 4s Extend bracket upward Noon, light cloud f/45 125 ND 5.0 8–16s Unpredictable, bracket wide
B. Mid-Morning and Mid-Afternoon
Roughly 9–10:30 AM and 3–4:30 PM in Corpus Christi. Longer atmospheric path, lower UV. Add approximately one stop of exposure for each hour away from noon under clear conditions.
Time Sun Elevation Exposure Adjustment Solar noon 65–75 degrees (seasonal) Baseline 1 hour from noon 55–65 degrees +1/2 stop: add 1–2 seconds 2 hours from noon 45–55 degrees +1 stop: double baseline time 3 hours from noon 35–45 degrees +1.5–2 stops: 3–4× baseline 4 hours from noon 20–35 degrees +2–3 stops: 4–8× baseline
C. Golden Hour
The hour before sunset and after sunrise. Maximum atmospheric path, disc softening, potential elongation from atmospheric refraction, and significantly longer exposures. The hardest condition to work in and the most rewarding when it comes off. The negatives look nothing like solar noon work.
The solar filter cell is always required during golden hour. The sun at low elevation looks dim to the eye but is still dangerous to view directly without filtration. Do not remove the filter cell until the sun is fully below the horizon.
At exposures of 2 minutes and longer, expect reciprocity failure with FP4 Plus. The effective film speed drops and the image will be underexposed without compensation. Bracket toward longer times and use 90-minute stand development for maximum density recovery.
Condition Sun Elevation Aperture Starting Exposure Bracket Range 30 min before sunset, clear 15–20 degrees f/22 or f/32 8s 4s, 8s, 16s, 32s, 64s 15 min before sunset, clear 8–12 degrees f/22 16s 8s, 16s, 32s, 64s, 2 min 5 min before sunset, clear 3–6 degrees f/16 32s 16s, 32s, 64s, 2 min, 4 min
Atmospheric haze at any elevation: double the starting exposure above and bracket more widely. Haze reduces UV unpredictably.
At golden hour, open the aperture to f/22 or f/16. The wider aperture reduces diffraction softening that the atmosphere would have introduced anyway, and keeps exposure times manageable.
Field Technique:
Scout the location the day before at the same time. Note where the sun sets and the tripod position that gives the composition.
Arrive 45 minutes before sunset with the camera mounted and the composition template installed. Confirm composition while the sun is high enough to project a clear bright spot. Lock tripod head settings with tape.
Make one exposure every 5–10 minutes as the sun descends. The disc changes quickly. Keep notes: time, aperture, exposure duration, atmospheric conditions.
For exposures over 30 seconds, the solar disc will trail slightly as it moves during the exposure. This is not a failure. At golden hour the elongation reads as presence and duration, a quality the clean noon disc does not have.
D. Blue Hour and Civil Twilight
Civil twilight is when the sun is between 0 and 6 degrees below the horizon. The disc is gone. What is left is the light the sun leaves behind: deep sky tones transitioning from orange at the horizon through blue-violet overhead. The technique is closer to lunar work than to golden hour. Bare lens, no filter, long exposures, aimed at the horizon or above it.
Once the sun is below the horizon, remove the solar filter cell. Never use the ND 5.0 filter for blue hour work. It will produce a completely blank frame.
Blue hour lasts about 20–30 minutes after sunset in Corpus Christi under clear conditions. Aim slightly above the sunset point for residual warm sky tones, or at the dark eastern horizon opposite the sunset for the deepest blue. Both produce interesting negatives.
With no filter and f/9 at ISO 125, exposures run from roughly 30 seconds early in the period to several minutes as full darkness comes. The composition template method is not practical at blue hour. Aim by rifle sights and mark tripod head settings based on pre-session planning.
Blue Hour Condition Aperture Starting Exposure Bracket Range Just after sunset (0–1 deg below) f/16 8s 4s, 8s, 16s, 32s Early blue hour (1–3 deg below) f/9 30s 15s, 30s, 60s, 2 min Mid blue hour (3–5 deg below) f/9 90s 45s, 90s, 3 min, 6 min Late blue hour (5–6 deg below) f/9 3 min 2 min, 4 min, 8 min
At exposures of 2 minutes and longer, reciprocity failure becomes significant. Bracket toward longer times and use 90-minute stand development. Blue hour work at these exposure lengths produces negatives with a soft, luminous tonal scale that suits salted paper well.
E. Horizon Phenomena
Within one to two degrees of the horizon, unusual atmospheric effects become possible. The Green Flash is a brief intense green rim visible for one to two seconds as the disc disappears below a clean sea horizon. It has been documented in Corpus Christi under clear conditions. The Omega Effect is a visible flattening of the disc due to differential atmospheric refraction, more reliably seen and photographed. Both require f/16 or wider, very long exposures, and aggressive bracketing. Treat them as bonus opportunities when already set up for golden hour, not as primary targets.
F. Solar Disc Movement
The sun moves approximately one full disc diameter every two minutes at any elevation. On an 8×10 frame with a 300mm lens the solar disc is approximately 28mm in diameter. For exposures over 30 seconds the disc trails slightly. For exposures over 60 seconds the elongation becomes part of the image rather than a problem. At golden hour with very long exposures, the movement reads as presence and duration.
VII. Lunar Photography
The moon requires completely different technique, filtration, and exposure strategy. The solar filter cell is never used for lunar work. It would block all useful light. The bare lens is used with no filtration.
The moon reflects sunlight. Its brightness varies enormously across its phases. The full moon at its brightest is approximately 400,000 times dimmer than the noon sun, roughly 19 stops. The exposures that required a dense ND filter and ran in seconds for the sun now run in seconds to minutes with no filter at all.
Remove the solar filter cell completely before any lunar session. Store it safely. Using it on the moon produces a blank frame.
A. Phases and Apparent Brightness
The moon’s brightness does not follow a linear progression from new to full. The full moon is disproportionately bright due to the Opposition Effect: at full phase, backlighting eliminates shadows on the lunar surface. A half-illuminated moon is approximately ten times dimmer than a full moon, not two times. Exposures for the half moon run 3–4 stops longer than for the full moon.
Phase Approximate Brightness Exposure vs Full Moon Full moon Maximum, nearly shadowless backlighting Baseline Gibbous (3/4 illuminated) Approximately 1/4 of full moon 2 stops longer Half moon (quarter phase) Approximately 1/10 of full moon 3–4 stops longer Crescent (1/4 illuminated) Approximately 1/50 of full moon 5–6 stops longer Thin crescent Very dim, near horizon only 6–8 stops longer
B. Lunar Exposure Table
Ilford FP4 Plus ISO 125, bare lens, no filter. One second minimum throughout.
At exposures of 2 minutes and longer, expect reciprocity failure. Bracket toward longer times and use 90-minute stand development for thin crescent negatives.
Phase Elevation Aperture Starting Exposure Bracket Range Full moon High (45+ deg) f/45 1s 1s, 2s, 4s Full moon Medium (20–45 deg) f/45 2s 1s, 2s, 4s, 8s Full moon Low (10–20 deg) f/32 4s 2s, 4s, 8s, 16s Full moon Very low (under 10 deg) f/22 8s 4s, 8s, 16s, 32s Gibbous moon High f/32 4s 2s, 4s, 8s, 16s Gibbous moon Medium f/22 8s 4s, 8s, 16s, 32s Half moon High f/16 16s 8s, 16s, 32s, 64s Half moon Medium f/16 32s 16s, 32s, 64s, 2 min Crescent moon High f/9 60s 30s, 60s, 2 min, 4 min Crescent moon Medium f/9 2 min 60s, 2 min, 4 min, 8 min Thin crescent Near horizon f/9 4 min 2 min, 4 min, 8 min
Starting points only. Lunar exposure is more variable than solar. Keep field notes, evaluate the developed negatives, and adjust the next session. When uncertain, lean toward overexposure.
C. Disc Size and Movement
The full moon’s apparent diameter is almost identical to the sun’s: approximately 0.5 degrees. At 300mm on an 8×10 frame the lunar disc is also approximately 28mm in diameter. The same compositional decisions apply.
The moon moves one disc diameter approximately every two minutes. For exposures of 1–4 seconds this is invisible on the negative. For the longer exposures required by crescent phases or low elevation, the disc will trail. At 2 minutes the moon moves approximately one full disc diameter, producing a streak rather than a sharp disc. For crescent work, trailing can be a deliberate choice. The thin arc elongated by its own motion across a large black field carries a quality of presence and duration: a record not just of the moon’s position but of the time it took to inscribe itself on the silver. Whether trailing is a defect or an intention is a decision only you can make. To minimize it, use f/9 to keep exposure times as short as possible.
D. Field Technique
Scout the location during daylight. Identify landmarks that will silhouette against the night sky. Note where the moon will rise or set using a moon phase app.
For full moon work, arrive 30 minutes before moonrise. The moon rising from a flat horizon (and the Gulf of Mexico from Corpus Christi beaches is about as flat as a horizon gets) produces images with the same character as solar golden hour work. Apply the same low-elevation exposure adjustments.
For composition template use at night: under full or gibbous moon conditions the projected disc is dim but visible when eyes are fully dark-adapted. Wait at least 10 minutes in darkness before trying to see the projected spot. Under crescent conditions the template method is not practical. Aim by rifle sights and pre-mark tripod head settings based on daylight planning.
Red flashlight for field notes and holder changes. Red light preserves dark adaptation. No white light when the film holder is open or the dark slide is out.
E. Phase Selection for Salted Paper Printing
The full moon at high elevation produces a negative comparable in density to a short solar noon exposure: dense, well-saturated, printing with full tonal range on salted paper.
The crescent moon produces a much thinner negative. The crescent shape itself on a large black field, particularly on 8×10 salted paper, is an extraordinary image with a completely different character from the full disc. The thin, luminous curve of light inscribed against darkness is an inherently Evolian image: the receptive lunar principle rendered in silver on organic material, the complementary pole of the solar series.
For a first lunar session, the full moon at high elevation gives the best chance of a usable negative. Learn the full moon first. Crescent work can follow.
F. The Speculum Solis as Speculum Lunae
The camera named for the sun is equally a mirror of the moon. The Evolian solar-lunar polarity finds its expression in the two photographic series this camera can produce. Solar prints made at noon with maximum filtration represent the active, direct, transcendent principle. Lunar prints made in darkness with bare lens and long exposure represent the reflective, chthonic principle.
Both series use the same process: the same camera, the same film, the same hand-coated salted paper, the same sunlight for printing the contact print. The only differences are the filter, the exposure time, and the hour of shooting. The unity of process across both series is the meaning. The same vessel, the same chemistry, the same organic emulsion, reflecting both the sun and the moon.
VIII. Film Loading, Records, and Development
Loading Film Holders
In complete darkness inside the changing bag, open the film holder. Ilford FP4 Plus has a notch code cut into one corner of the short edge. Hold the film with the notch in the upper right corner: emulsion faces you. Slide the film in emulsion facing the lens side. Close and lock. Flip the holder and load the second sheet the same way.
Dark slide status: silver side out is unexposed. Black side out is exposed. Never mix these up.
Field Notebook
Keep a waterproof field notebook for every session. Record: holder number, side, date, time, subject, elevation, phase if lunar, aperture, exposure duration, atmospheric conditions, and composition point.
Field Example Holder and side Holder 2, Back Date and time June 15, 12:45 PM Subject Solar noon / Golden hour / Blue hour / Full moon / Crescent Elevation 70 degrees / 8 degrees / 35 degrees Aperture f/45 / f/22 / f/9 Exposure 4s / 32s / 2 min Atmospheric conditions Clear / Light haze / Thin cloud / Marine layer Composition point Lower left golden ratio / Dead center Notes Unusual conditions, disc appearance, filter condition, trailing observed
Development: Stand Development in Rodinal
Parameter Value Developer Rodinal (R09 One Shot) at 1:200 dilution Temperature 20°C (68°F) Agitation First 60 seconds only, then stand completely undisturbed Time 60 minutes for normal density / 90 minutes for maximum density Fix Rapid fixer full strength, 3–4 minutes Wash 30 minutes running water Evaluate On lightbox: solar noon negatives very dense; lunar negatives proportionally less so
Use 90-minute stand development for thin crescent negatives and for any exposure of 2 minutes or longer. For full moon and solar noon negatives, 60 minutes is sufficient. When in doubt, develop for 90 minutes. You cannot over-develop for salted paper contact printing.
IX. Salted Paper Contact Printing
Salted paper is a printing-out process. The image forms from light exposure without chemical development. Silver chloride in the hand-coated emulsion darkens under UV light. Fix it and wash it. The entire printing process uses sunlight.
Silver nitrate stains skin black on contact. The stains last for days. Nitrile gloves and safety glasses at all times. Old clothes or a dedicated apron. Silver nitrate permanently stains wood, fabric, and most surfaces it contacts.
Paper Preparation
Size the paper: dissolve 2g gelatin in 100ml warm distilled water. Brush one thin even coat onto Fabriano Artistico 300lb hot press paper. Dry completely, minimum one hour.
Salt coat: dissolve 3g non-iodized sodium chloride per 100ml distilled water. Mix with egg albumen at equal volume. Apply one even coat to the sized paper with a dedicated hake brush. Dry completely in normal light.
Sensitizing: Under Dim Amber or Red Safelight Only
Mix 12% silver nitrate solution: 12g crystals per 100ml distilled water. Store in brown glass bottle. Float paper face-down on the solution for 2–3 minutes or brush on evenly with a dedicated hake brush reserved for silver nitrate only. Dry in complete darkness.
Loading the Contact Frame
Negative emulsion-side down against the sensitized paper emulsion-side up. Sandwich between two pieces of 10×12” optical glass. Clamp firmly with six binder clips around the full perimeter.
Exposing the Print
Direct full sun at or near solar noon. The image will appear and darken visibly. Check progress by loosening one clip, lifting the edge slightly, reclipping. Expose until the print looks noticeably darker than the desired final tone. Fixing lightens the image by one to two stops. Typical range in Corpus Christi: 5–20 minutes.
Processing
Step Chemistry Time Notes 1: Fix Sodium thiosulfate 15%, 150g per liter 2–3 minutes Gentle agitation. Image shifts from reddish-purple to warm brown. 2: Hypo clear Hypo clearing agent per package instructions 2 minutes Gentle agitation. 3: Wash Running tap water 10–15 minutes Removes all residual fixer. 4: Final rinse Distilled water 30 seconds Removes mineral deposits. Essential for exhibition prints. 5: Dry Flat on clean screen under light weight Several hours Prevents cockling.
Wet Paper Handling
Always support the full sheet from beneath with both hands flat. Never pick up by a corner or edge. Wide flat print tongs engaging the full short edge. Use 11×14” trays so the paper floats freely. Dry flat under light weight. Never hang wet paper.
X. Storage and Preservation
Gulf Coast humidity makes fungus prevention an ongoing concern. Lens fungus is effectively irreparable.
Lens Storage: Airtight container with Eva-Dry E-333 desiccant. Check indicator beads monthly: orange is dry and active, green means it needs recharging. Recharge 10–12 hours maximum: never exceed 18 hours. Cap front and rear elements when not in use. Handle only by barrel. Air out monthly.
Camera Storage: Eva-Dry E-333 inside the camera body. Store in a large ziplock bag with additional silica gel. Keep in air-conditioned interior, away from temperature fluctuation.
Solar Filter Cell Storage: Rigid protective case lined with soft foam. The Baader film is fragile: a pinhole or tear means replacing the whole cell. Nothing stacked on top. Check the film surface visually before every solar session.
Film Storage: Ilford FP4 Plus in its original sealed box in a cool dry location. Once opened, store in a sealed container with silica gel.
XI. Checklists
Complete the assembly checklist once before first use. Complete the pre-session checklist before every session.
Assembly Checklist
Lens seated firmly in flange, no wobble or play
Lens board tilt confirmed zero: lens axis perpendicular to board face
Aperture ring turns smoothly and clicks at each f-stop
Lens glass completely clear when held to light
Solar filter cell mounted securely, no gaps around lens barrel
Filter cell confirmed light-tight by flashlight test
M39 lens cap threads on and off smoothly
Lens cap fully covers lens with margin on all sides
Sharpness confirmed by test exposure before pins were drilled
Lock pins seated firmly through both box top panels
Focal length confirmed 300mm from lens rear face to back panel interior
Tripod insert accepts tripod head screw smoothly
All three Graflex holders slide smoothly into channels from top of back opening
Each holder seats firmly with face flush against back panel
Weatherstrip foam compresses evenly around holder perimeter
Dark slides pull and replace smoothly on all three holders
Dark slide convention: silver side out is unexposed, black side out is exposed
Dovetail rail secure, both sights locked, confirmed parallel to lens axis
Zero light leaks: flashlight test and photographic paper test both passed
Silica gel desiccant placed inside camera body
Composition template cut to holder gate dimensions with all five pinholes
Pre-Session Checklist
Determine subject: solar noon, golden hour, blue hour, full moon, or crescent. Select correct filter configuration.
Solar and golden hour: filter cell mounted, gaffer tape fresh, no gaps, flashlight test passed
Blue hour and lunar: filter cell removed and stored, bare lens confirmed
All film holders loaded with fresh FP4 Plus in the changing bag
All dark slides confirmed silver side out on loaded holders
Field notebook with a fresh page, pen working
Stopwatch or phone timer ready for exposures over 10 seconds
Exposure bracket plan written in notebook before leaving. Reciprocity failure noted for all exposures of 2 minutes and longer.
Sun or moon elevation and position calculated for the session time
Blue hour: sunset time confirmed, post-sunset timing planned
Tripod set up and camera mounted. Composition confirmed with template where practical.
Red flashlight for night and blue hour sessions
Lens cap on lens confirmed before transporting